Travels in Wine World: The Pinhão Train Station

136If you find yourself in the city of Porto—once you have taken your fill of the gorgeous waterfront, the amazing tours of the Port Wine Lodges, and the walking back-and-forth across the bridges—you should get yourself a train ticket.

Arrange to leave early in the morning, when the São Bento Railway Station is a world unto itself, and be sure and hit the snack bar for some coffee (café com leite) for the road.  Pick up a few custard tarts—Pasteis de Nata—as well, because one should never pass up the opportunity for Pasteis de Nata, and you can only get the real deal in Portugal.

Make sure your ticket is for Pinhão, and grab yourself a window seat.  137
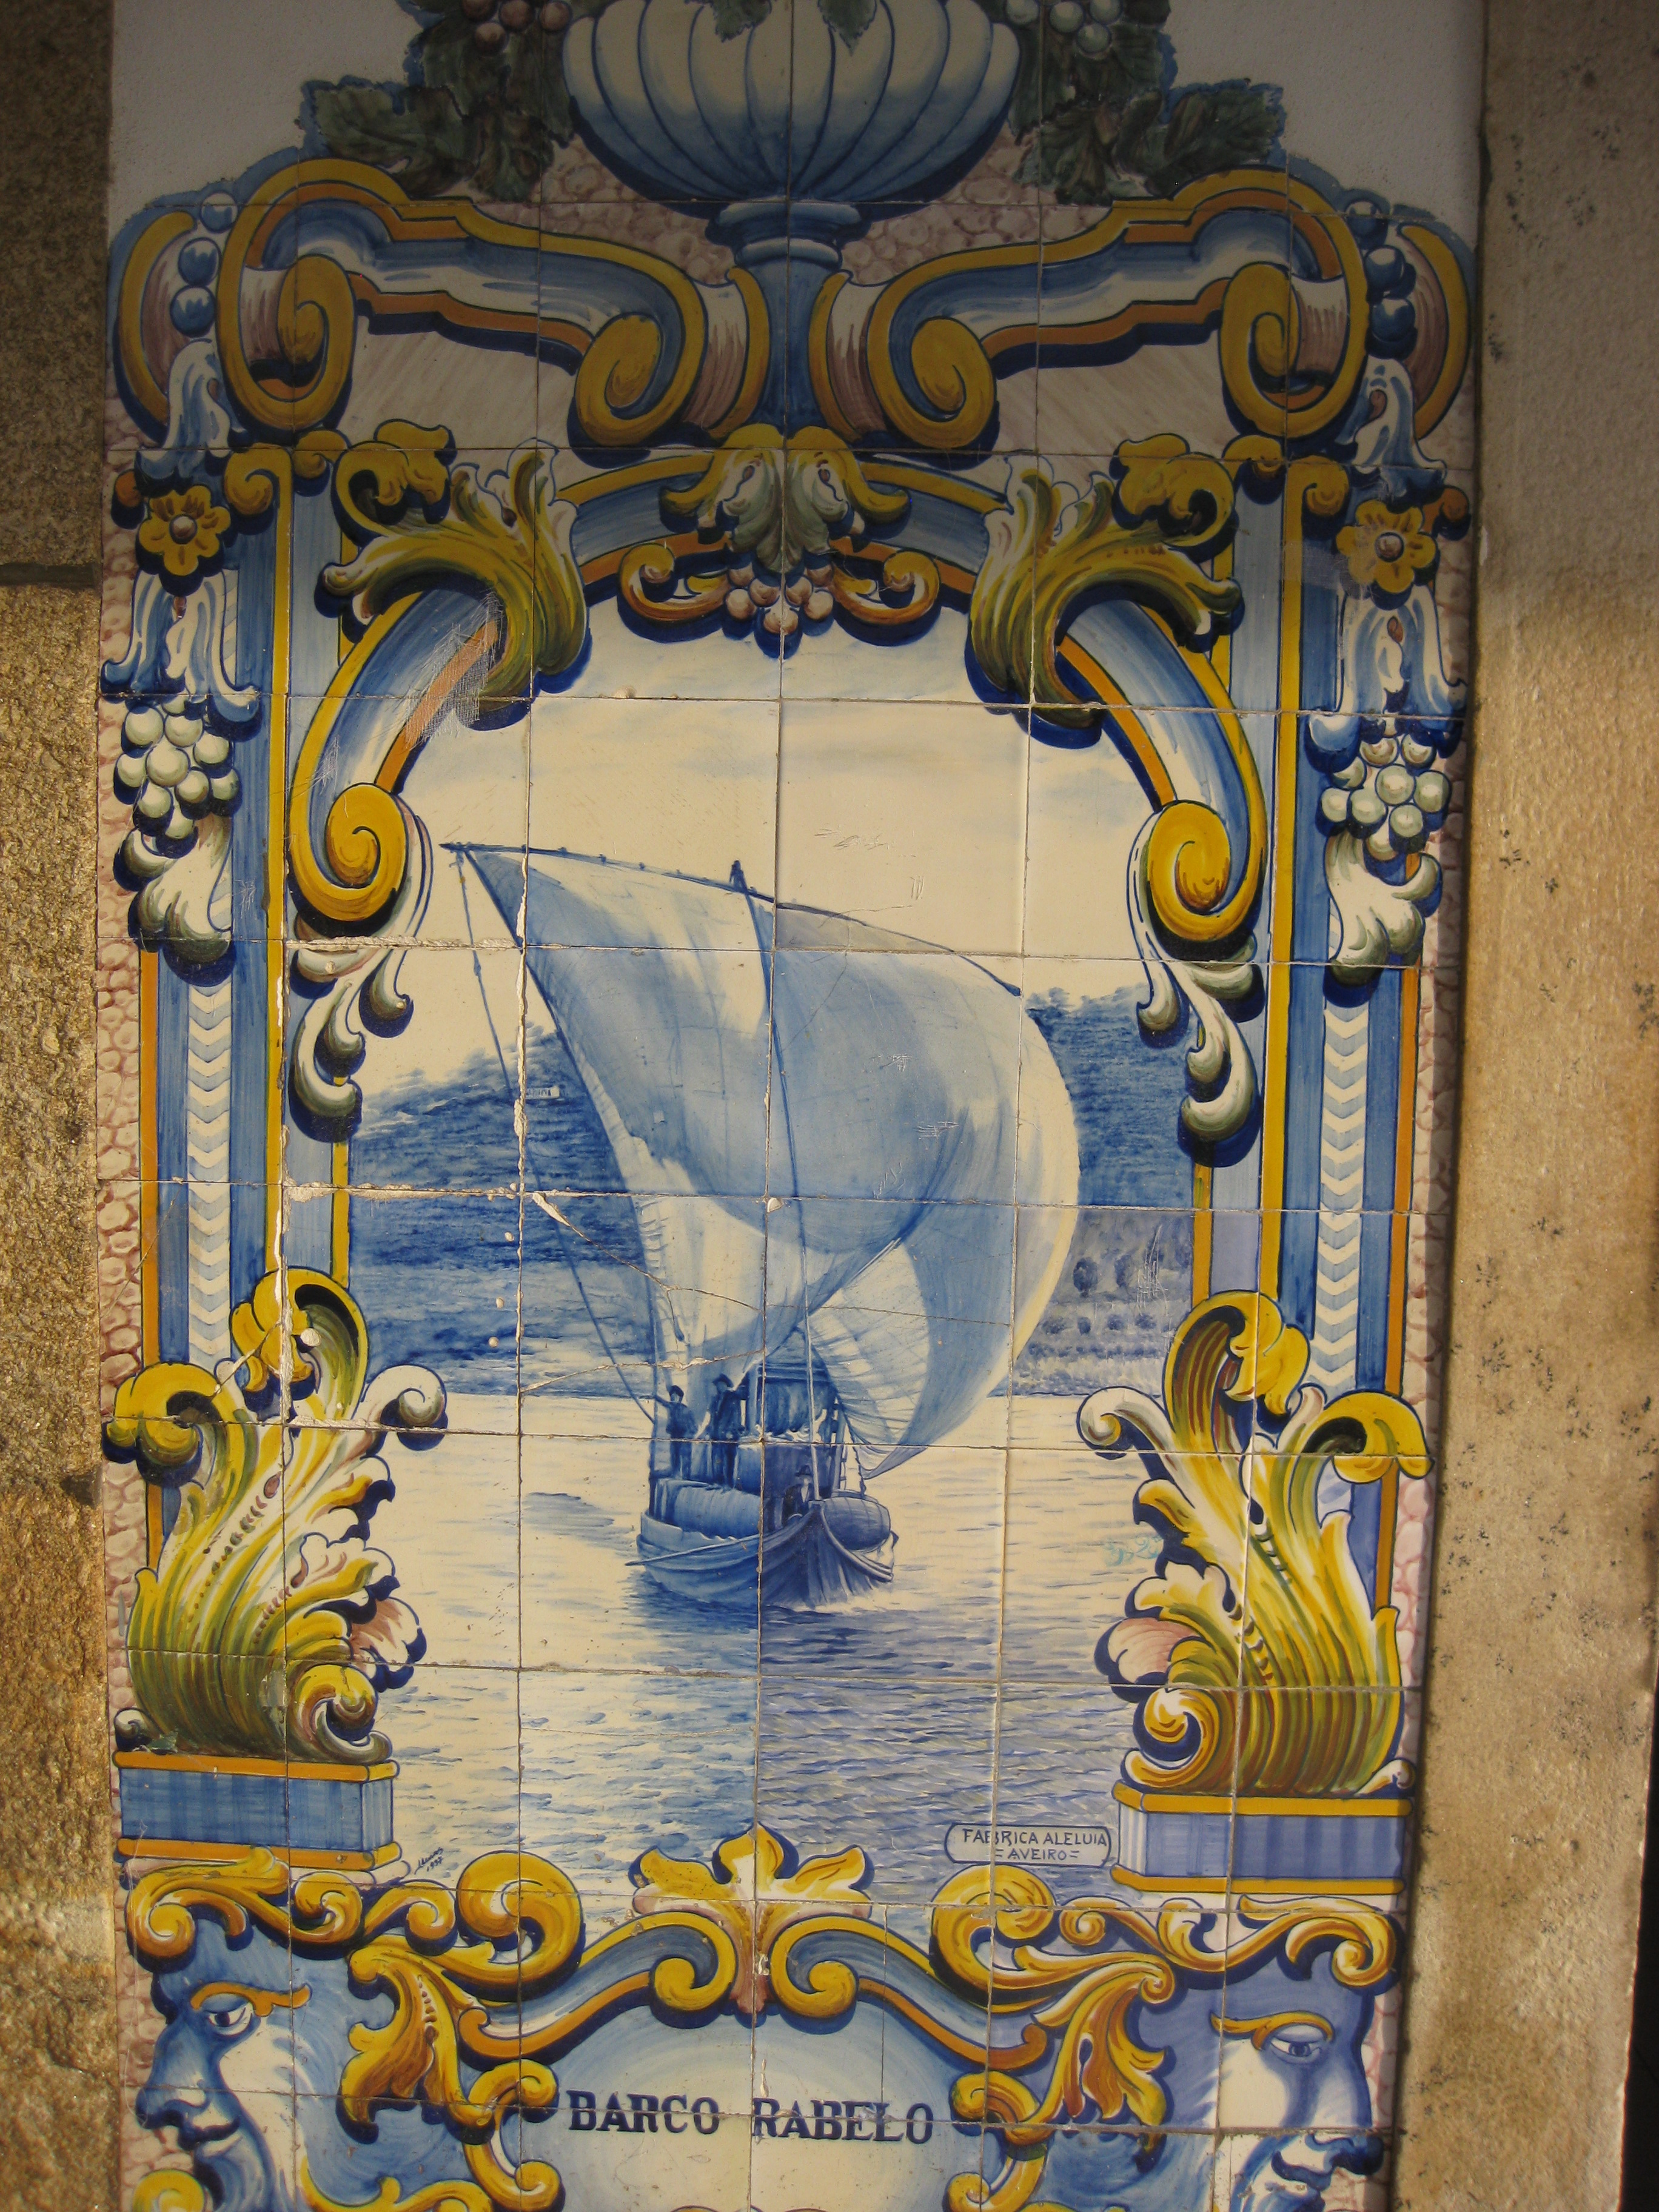
Prepare yourself for a journey of about three hours. Don’t be concerned that there might be some error in the schedule. This is not the high-speed train that whisked you 200 miles from Lisbon to Porto in 140 minutes, but one that will wind you along the banks of the Douro River, pull you through dark tunnels, and rattle you along cliff-hanging tracks.  It will indeed take three full hours to cover 70 miles.

Your train journey will land you at the Pinhão train station.  You’ll be smack in the middle of the Cima Corgo, the geographic center of the Douro DOC and the core of the Port Wine production region.  You’ll be able to check into a rustic little hotel or take a suite at The Vintage House (a somewhat incongruous yet delightfully glistening resort just a short walk away).  You’ll be able to wander the steep riverside streets in search of lunch or take a death-defying taxi ride straight up the side of the mountain to Fonseca’s Quinta do Panascal Vineyards.

140
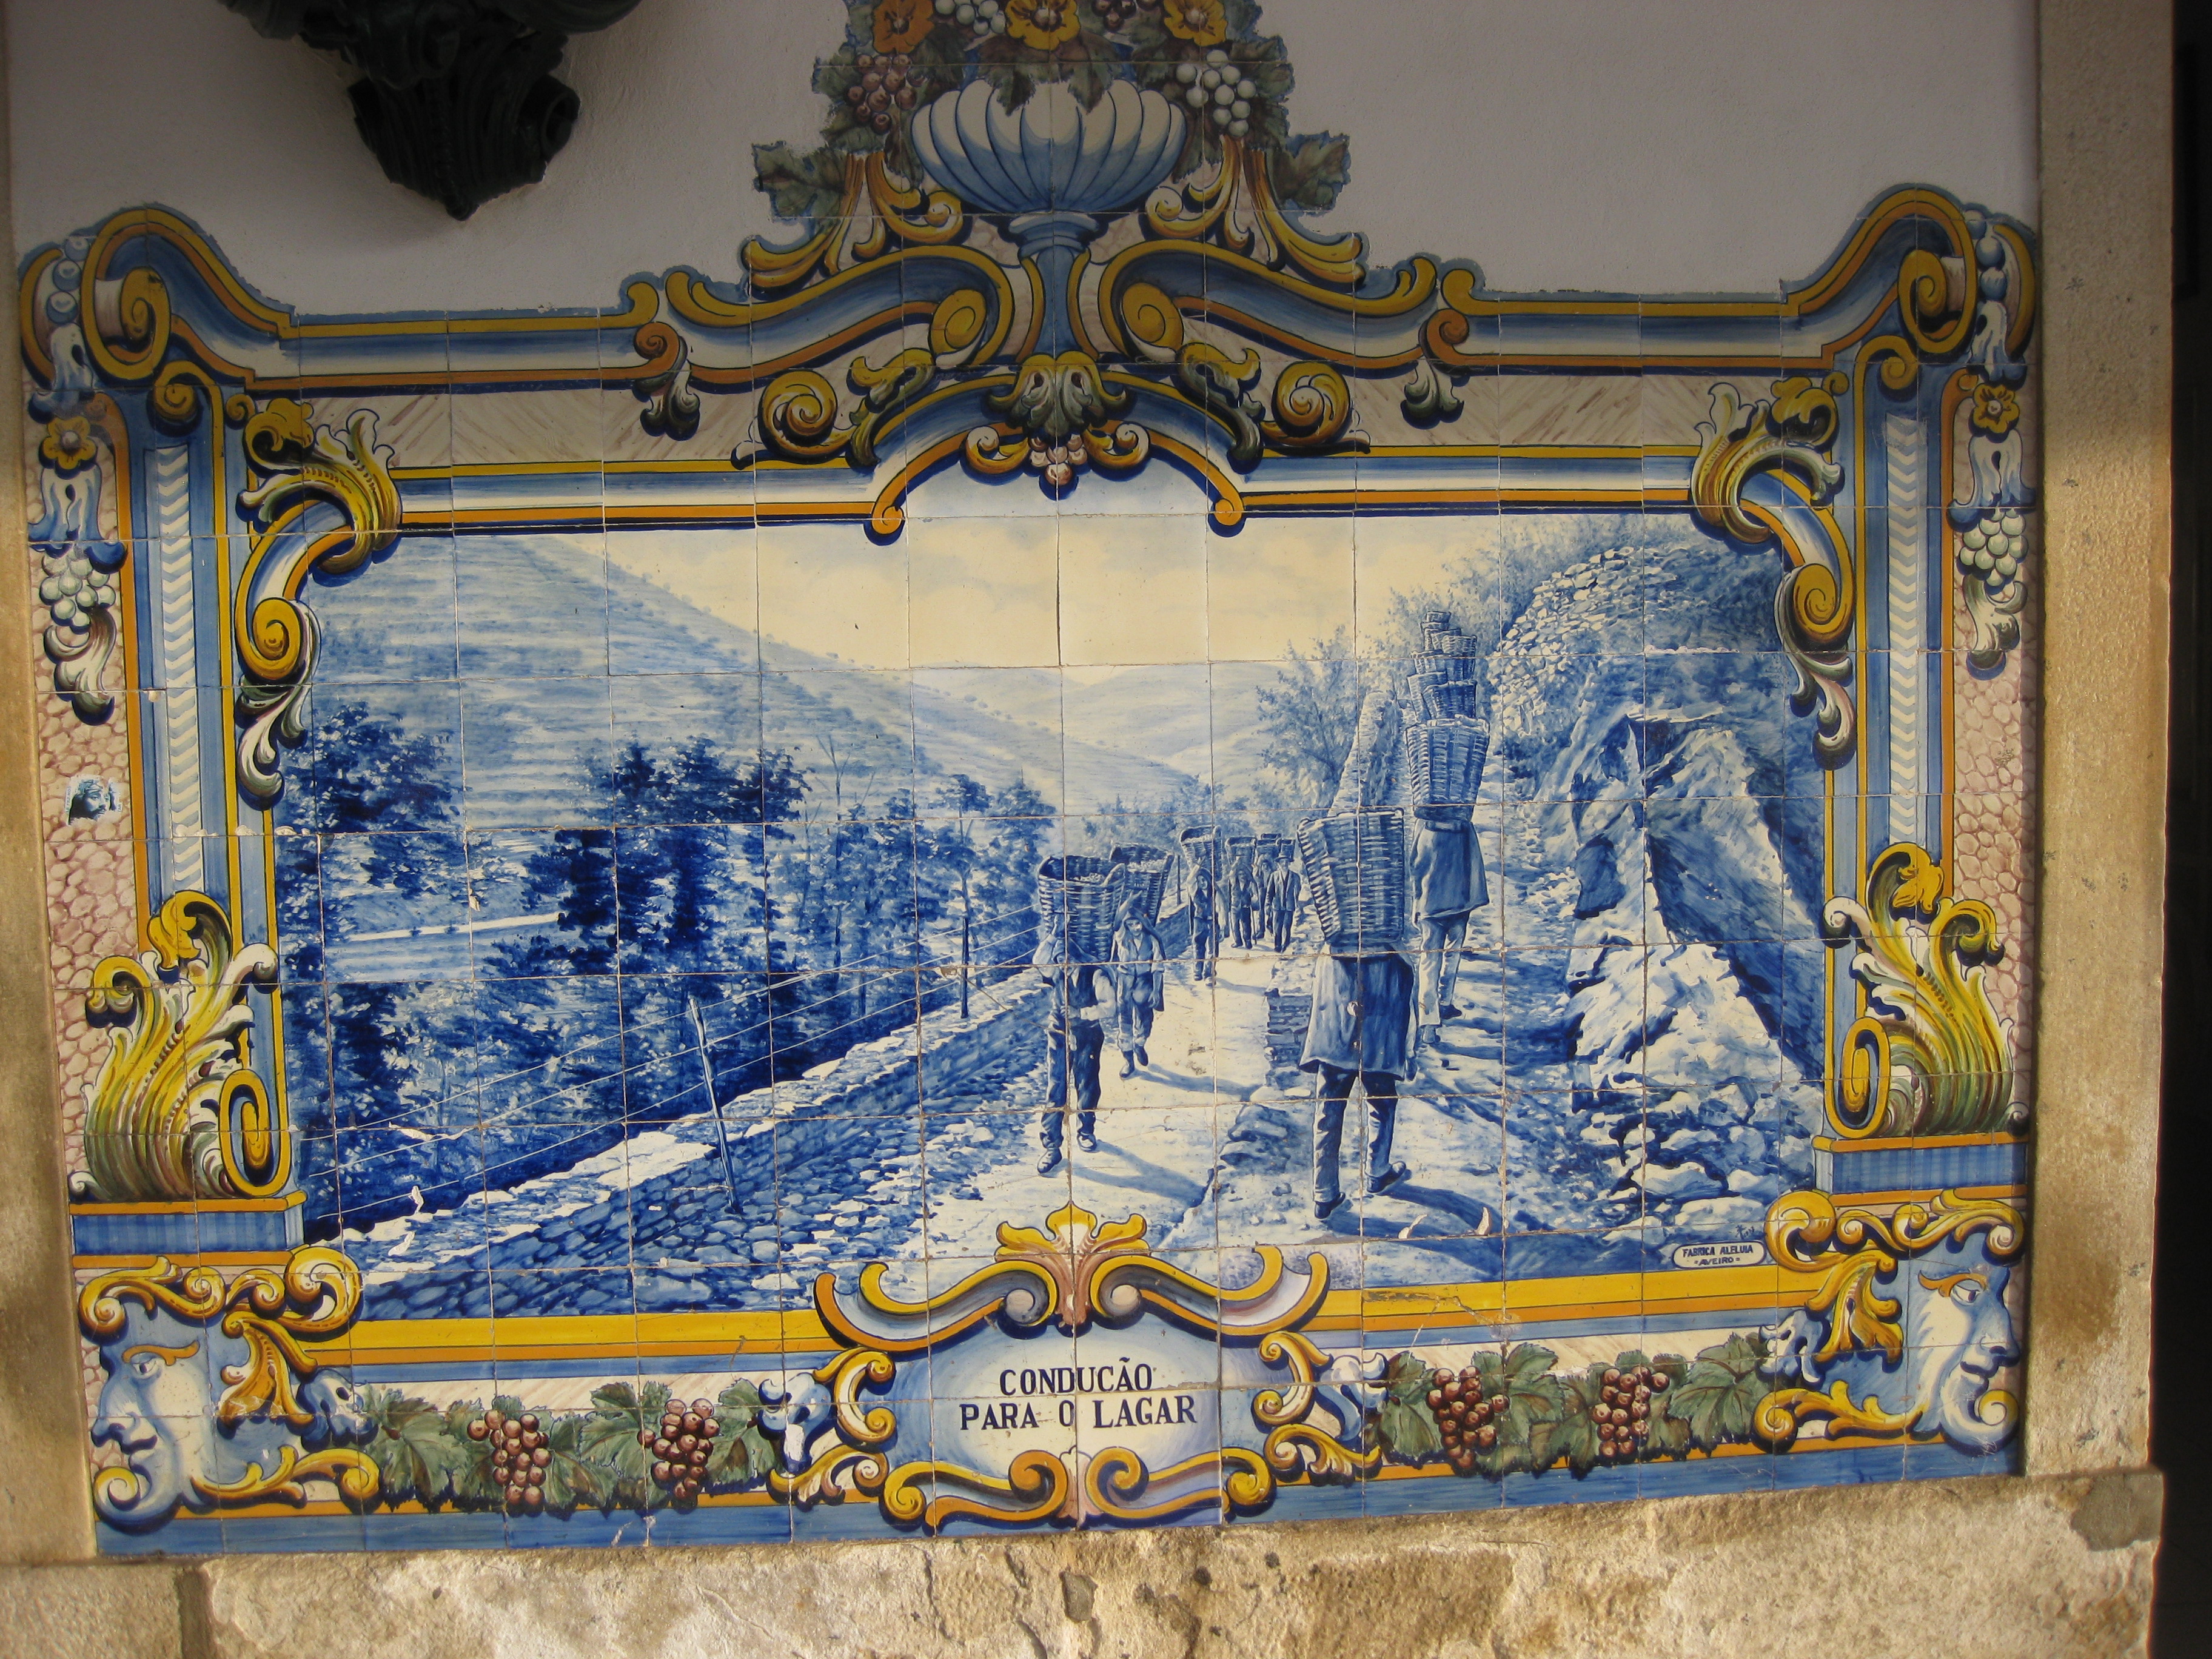
But before you can check into the hotel, wander the streets, or tour the vineyard, you will have to tear yourself away from the train station itself.  It’s just a tiny station and only one room.  It is so rustic that you have to hustle down and across the tracks themselves to catch your train—there’s no fancy pedestrian overpass or glass elevator here.  But you’ll find it hard to tear yourself away once you notice the blue tile mosaics—a local specialty known as azulejo—that line the walls of the station.

Azulejo is a form of Portuguese ceramic tile that is painted and tin-glazed. As a central aspect of Portuguese culture, Azulejo has been produced without interruption for five centuries. There is even a national Azulejo gallery in Lisbon—although you can see Azulejos everywhere in Portugal.  Azulejos are found on the interior and exterior of churches, palaces, ordinary homes, department stores, and—as you can tell from my story—railway stations.

These beautiful Azulejos have been a part of the Pinhão train station since 1937.  They chronicle the history of the town and the vineyards, the wineries, and life along the Douro River.

The Bubbly Professor is “Miss Jane” Nickles of San Marocs, Texas

Pictures of Pinhão from the Portugal leg of our Iberian Peninsula honeymoon, 2010.  That’s Shields T. up there, guarding the luggage while his wife takes pictures of the walls.

145138


Perfect Pairings: Wines for Thanksgiving

When pairing wines with a big turkey dinner, it’s time to take sides. 

By this—taking sides—I do not mean that you have to get involved in every family feud that comes up around the dinner table. (oh. please. no.) Rather, I mean that it is a good idea to choose your wines with a mind to the varied tastes and flavors of your side dishes.  Turkey—typically the main event on T-day—is actually quite neutral in flavor and can pair nicely with a variety of wines.  Side dishes for turkey, however, include the sweet (think yams topped with mini marshmallows), the spicy (sausage stuffing), the salty (gravy), and the tangy (pickles, olives, and cranberry sauce).

It takes a fruity, acidic wine with no chance of clashing flavors to match that schizo of a meal.   

I know this subject has been talked to death, that opinions on the matter run hot, and what the world needs now is hardly one more blog post on what wines to serve on Thanksgiving.  So, it is with humility and a bit of trepidation that I offer the following ideas on choosing wine for Thanksgiving.

#1—Choose a wine with lots of crisp, lively acidity:  Tangy foods, such as cranberry sauce, citrus, or anything from the relish tray, need to be paired with wines that can stand up to the challenge.  To be safe, serve a wine that has lively acidity to begin with and your wine will maintain its balanced flavor even in the presence of acidic foods.

#2—Choose a wine with fruit-forward flavors:  Cranberry sauce, sweet potatoes, creamed corn and yams…due to the fact that they have a degree of sweetness, these foods pair best with a wine that has a very fruit-forward style. A wine with a hint of sweetness is ideal, as any sweetness in a food will diminish the fruitiness or sweetness of a wine.  For these reasons, it is a good idea to start with a wine with a good deal of fruit flavors—and maybe even a touch of sweetness—in order to preserve the wine’s balance with these types of foods.

#3—Choose a wine that is low-to-moderate in tannin:  Tannin is an integral part of the taste, flavor, and structure of most red wines. It’s also the component that gives many wines their structure and grip while lending a velvety mouthfeel to others.  However, as beloved a high-tannin wines may be, it pays to go moderate with the tannin in the wines we serve on Thanksgiving. The reason—simply put—is that too much tannin can clash with spicy flavors; those sweet tastes can also be anproblem (as they can bring the bitterness and astringency of a tannic wine to the forefront).  To avoid a clash of the titans that might end up with a metallic or bitter taste in your mouth, keep those red wines low-to-moderate in tannin. You might look for a red wine described as smooth, ripe, or velvety.

#4—Choose a wine with low-or-no noticeable oak influence:  Oak is a beloved flavor enhancer of many wines, and lots of people love oak aromas and flavors.  However, highly oaked wines can clash with some food flavors; to avoid this clash, choose a wine (or wines) with no overt oak flavors (especially the bitterness that often can be sensed on the back of the palate). These oak-derived tastes can clash with foods that are slightly sweet, a bit fruity, or a tad spicy (and there will be plenty of all of these at a typical Thanksgiving feast)!

#5—Choose a wine that is moderate in alcohol:  Alcohol, while part of what makes wine so delightful, has a tendency to clash with certain tastes and flavors, and with all the flavor mingling going on at Thanksgiving, this cage match is likely to happen.  all possible, keep your wine choices in the moderate alcohol range (lower than 14%, dessert wines excepted). On the other hand, if you enjoy the sensation of throwing gasoline on a fire, go right ahead and serve a 15% abv Napa Cab.  And then there’s this…turkey already has enough drowsiness-inducing tryptophan to put you and your relatives to sleep before the first kick-off of the first football game of the day. We don’t need any help from excessive amounts of alcohol!

#6—Remember the reason for the season: American Thanksgiving is a US-centric holiday, a celebration of the bounty of the fall harvest, and a time to be grateful. As such, sometimes I like to choose my wines for Thanksgiving with these ideas in mind. As this is a US-centric holiday, it’s a great time to focus on the wines of the United States. To accomplish this, you could focus on the well-known American wines such as Monterey Chardonnay. Napa Cabernet, Paso Robles Zinfandel, Oregon Pinot Noir, or Washington State Riesling. You could also focus on the lesser-known but still fascinating wines of Idaho, New York State, Virginia, Texas, or any of our other wine-producing states. To add the aspect of celebrating the harvest, try a Beaujolais Nouveau from France. It might not be anyone’s idea of the finest wine on earth, but it represents a true celebration of the harvest, as signified by the early release of the just-made wine of each year.  As a way of expressing gratitude…choose a wine to appeal to those you are most thankful for….seek out your father’s favorite Burgundy, your granddaughter’s beloved white zinfandel, or your oldest friend’s favorite wine. You can’t go wrong.

Bubbly Professor’s Wine Suggestions for Your Turkey Dinner:

  • Riesling from Alsace, Germany, or Washington State
  • Viognier from Texas, California, or The Rhône Valley of France
  • Unoaked Chardonnay
  • Bubbly—any dry or semi-dry sparkling wine; pink versions pair well with a wide range of food, and Prosecco is always a good choice
  • For the adventurous…Sparkling Shiraz
  • For the less-than-adventurous…Moscato d’Asti
  • Dry rosé—an all-around great choice! Serious, French rosé—such as those made in Tavel or Lirac—is a great choice. American rosé of Pinot Noir will work as well.
  • Zinfandel from Lodi, Paso Robles, Sonoma, the Sierra Foothills (Amador or El Dorado County)
  • Pinot Noir from Burgundy, California’s Central Coast, or Oregon
  • Beaujolais
  • Or, of course, you can use this philosophy:  serve anything you like…it’s just one day out of life!

Happy Holidays, Everyone!! No matter what you serve, enjoy the day and give thanks for all the good things in your life! 

The Bubbly Professor is “Miss Jane” Nickles of Austin, Texas… missjane@prodigy.net

Train the Trainer: Mirror, Mirror

Several weeks ago, as I was reviewing about 5,000 end-of-the-semester course evaluations reflecting the work of 25 full-time instructors (plus a slew of adjuncts), I noticed a trend.  Oh sure, there were the usual comments about grading policies and reading assignments, but I also noticed that a large number of the surveys mentioned the instructor’s enthusiasm.  It was no big surprise that the positive evaluations mentioned the instructor’s obvious love of the subject matter and their enthusiasm in class.  This I have seen before.  However, I noticed an overwhelming amount of the less-than-perfect evaluations had statements such as “the teacher just didn’t have any passion” or “instructor showed no enthusiasm for the class or the material.” Ouch.

As educators, we are always looking for that spark that will engage our students, and we’re always told to “be enthusiastic.” I’ve told myself and my faculty that very thing a thousand times.  But reading those surveys brought out the Academic in me and I wanted to know “why”.  Why is it that gusto of the teacher has such an impact on the student in terms of both engagement and learning?  The answer, it seems, is something called “Mirror Neurons.”

Mirror Neurons are a recent discovery, having been first identified in 1980 by an Italian Neuroscientist named Dr. Giacomo Rizzolatti. Dr. Rizzolatti and his team discovered that in a monkey’s brain, the exact same neuron is fired when a monkey performs a specific act, such as grasping a peanut, as when the monkey observed a human perform the same act.   It seems that “monkey see, monkey do” might be the exact same thing, at least to the neurons in the monkey’s brain! 

This initial discovery, soon termed “mirror neurons,” led to research on human mirror neurons, and some fascinating implications for education.  The two facets of mirror neurons that I find the most interesting and relevant to adult education are:  (1) Mirror neurons allow us to feel what someone else is feeling, and (2) Mirror neurons allow us to learn through observation as well as action. 

Mirroring Emotions

We’ve all experienced the effect of mirror neurons on our emotional state; in fact, we experience it everyday.  You are walking down the street and somebody barely misses getting hit by a car – woah! Your heart starts racing, you recoil in sympathy, you actually feel the fear in your gut. Or you find yourself enjoying a nice movie, having a great time, but as soon as the leading lady gets her heart broken, you can’t stop crying! For decades, such responses puzzled neuroscientists. Now we know that on a certain level, watching something happen to someone else and having it happen to us fires up a reaction in the same part of the brain – right down to a single neuron. 

The implication for education is pretty strong; if the teacher is in a good mood, that good mood will rub off on the class. If the teacher is enthusiastic about the subject, your students’ mirror neurons will fire off a corresponding enthusiasm in their brains as well.  And we all know that enthusiasm, engagement, and attention all equal enhanced knowledge retention, so anything I can do to enthuse my class is a good start. I don’t know about you, but just knowing about mirror neurons makes me feel much more responsible for my mood in class; who knew we really could affect one another’s outlooks so directly?

Of course, as teachers we have all experienced the flip side of the mirror neurons in action:  one student in a foul mood can bring the whole class down, and quickly.  Thankfully, as the person standing in front of the room, you  can reign in or remove Debbie Downer from the back row before the negative classroom phenomenon that I have always called “the feeding frenzy” gets out of control. 

Mirroring Knowledge

One of the very cool “tricks of the trade” we have as educators is to tie new information to something the student already knows. This is known as “anchoring information” and involves finding an aspect of some a topic that might be familiar to the students– such as  the “Charlemagne” of “Corton-Charlemagne” – before introducing new information -such as the geography of Aloxe-Corton.  The familiar topic, already safely present in long-term memory, provides an existing framework that  helps working memory grasp onto and make sense of new information.

This technique is so profoundly successful that I have often wondered just how we aquire that first bit of new information about a topic.  If we have no knowledge to anchor to, what lights the spark that leads to the acquiring of original knowledge? Rote repitition?  I hope not.  Relevant visuals?  They only work some of the time.  The answer could lie in mirror neurons. 

It seems that new knowledge, including that which occurs in babies learning to make sense of the world and the ease with which young children acquire new languages, is the direct  result of the action of mirror neurons.  A baby watches the people around her and soon figures out how to move, and walk, and talk.  

It sounds amazing, but it just could be true that without the direct learning of new knowledge and skills that is afforded by mirror neurons, there would be no basis on which to build (“anchor”) new learning. 

Maximizing the Mirror

There’s one more fascinating implication for education:  the effect of mirror neurons is amplified with study.  This was proven at a 2003 study at the University College of London, led by Dr. Daniel Glaser, that tested mirror neurons at a dance demonstration. The test found that people who had studied ballet showed more mirror neuron activity during a ballet demonstration than those who had not.  It’s a fascinating conclusion, but do you think my students will do their textbook reading assignments if I tell them it will amplify their mirror neuron reaction during the next class? 

Perhaps I should just keep that to myself.

The Bubbly Professor is “Miss Jane” Nickles of Austin, Texas

missjane@prodigy.net

Flip it Good!

The Flipped Classroom…we’ve all heard and read a great deal about it, and I have been enthusiastically using it in my Professional Wine Studies Class for about a year.  (In case this is the first time you’ve heard of flipping a classroom, you can read one of my original posts about it here.)

About a week ago, I wrapped up a semester of teaching in a mode that I deem “as flipped as humanly possible.”  I tried to take every possible opportunity to fill my classes with “ABL” (Anything But Lecture),  while making sure that the “transmission” of new knowledge occurred one way or another, whether inside or outside the classroom.  (In a true “flipped classroom”, the transmission of learning takes place outside the classroom.  This assumes our students do the reading or the watching of assigned videos.  I’m still easing my students into that idea.)

To achieve my “as flipped as possible” goal, I used in-class activities, discussions, and group projects daily.  Sometimes the activities worked out great, and sometimes I found myself tap-dancing to keep the class in order. 

Here’s a few things I learned during my semester of flipping dangerously:   

1.  Keep the groups small.  I found that for a many projects, 2 students is an ideal number.  It seems that with only two students in a group, no one can afford to be the “group slacker.”  Three people in a group also works well, but in groups of 4 or more you tend to have 1 or 2 people working diligently, and 1 or 2 people playing on their iPhones.

2.  As soon as the teams are arranged, have the teams choose a group leader who will be responsible for turning work in, presenting their work to the class or ensuring that the group gets credit for their assignment, in whatever form that is. 

3.  Always have “extra credit” or “further learning” sections of a project available for the one hot shot group or team that does a great job and finishes before everyone else.  If you don’t have extra activities for them, the hot shot group will not have anything left to do and may feel that class is a “waste of time.”

4.  Pre-script every class project or discussion with “Come Get Me” moments.  Design these so that after each segment of a class project, the students stop and discuss it with you before moving on.  Another way to keep the class on an even keel is to divide a group project into chunks that should take about 15 minutes to a half hour.  After every “chunk”, bring the class back together to share and discuss their findings.  

6.  Most important of all, remember that the time when your class is working in groups or otherwise on projects, you as the instructor are still “on stage” as much as when you are lecturing.  This is NOT your time to catch up on your email, read a book, or grade papers.  While you don’t want to “hover over them” and make everyone nervous, you also don’t want to disengage.  I’ve found the best thing for me to do while the students are working in groups is to sit down somewhere off to the side of the classroom and keep an eye on the groups, much as I do when proctoring a test. That way everyone knows where to find me, no one feels like they are “interrupting” me when they ask for help, and I can quickly respond to a group that wants to “flag me over”.

What do you think?  Do you have any “Flip it Good” advice?  We’d love to hear from you!

The Bubbly Professor is “Miss Jane” Nickles of Austin, Texas

What is “Sticky Teaching”?

 Just what is Sticky Teaching???

Over the years, I’ve written dozens of articles and essays on the subject of “Sticky Teaching.”  I’ve given hundreds of workshops called “Sticky Teaching.”  I have read articles on the subject written by other people, and attended their Sticky Teaching workshops as well.  One of the more memorable had the attendees (my befuddled self included) sitting in circles and reciting the ten Grand Crus of Beaujolais while slapping our legs and snapping our fingers.  Perhaps that session should have been called “Snappy Teaching.”

I was reflecting on this “sticky teaching history” earlier this morning as I sat down at my computer to design yet another handout for yet another workshop on “Sticky Teaching.”  In this light, I thought it might be a good idea to come up with a new and improved definition of just what is meant by “Sticky Teaching”.  Keep in mind that this is my personal definition, reflecting my teaching style, and by that I mean that any other educator in the world is allowed to have their own definition of “sticky teaching” and I will respect it!

Here it is, the 2012 definition of Sticky Teaching, Bubbly Professor style:  Sticky Teaching is teaching that is engaging, understood, and memorable.

It’s simple:  in order to provide teaching that sticks, first, we need to teach in a manner that not only grabs the attention of but also nurtures the engagement of the audience over the long haul – the entire course of the class and beyond. Second, we need to make sure our lesson is simplified and organized in such a way so that the main points of the lesson are easy to comprehend.  While the  A+++ students may easily grasp the whole lesson including the details, we need to ensure that every student can and will understand the “gist”. Last but not least, we need to somehow present the topic so that it breaks through the limitation of short-term memory and becomes permanently embedded in long-term memory.     

When stated this way, the goal of sticky teaching sounds like it may take a lifetime to achieve, and it probably will. Teaching is a profession that lends itself to constant improvement.  Even the best teachers I know are always looking for ways to improve their teaching. Most likely, that is why they are the best teachers I know.

Here are a few examples of the techniques of sticky teaching: 

 Sticky Teaching is Engaging:

  • Use Dramatic Tension (keep them wondering “what happened next”)
  • Create a Knowledge Gap (pique curiosity by setting up a “mystery”)
  • Use concept testing (Have students make a prediction and then prove/disprove)
  • Heed the ten-minute rule (Change the locus of attention every ten minutes)
  • Challenge the audience (Make critical thinking part of every class) 
  • Make it experiential (Replace abstract theories with concrete experiences)

Sticky Teaching is Understood:

  • Identify your core message (Keep it easy to understand)
  • Use statistics in understandable form (use the human scale principle)
  • Provide Cognitive Guidance (point out what’s important to know)
  • Use the power of Schema (put things in context)

Sticky Teaching is Memorable:

  • Anchor information (tie new topics to information the student already knows)
  • Use ECS (Emotionally Competent Stimuli)
  • Use the narrative approach (Tell Stories)
  • Use the PSE (pictorial superiority effect)
  • Utilize dual coding (sync the visual and the verbal channel)

Obviously, some of these teaching techniques overlap categories. For instance, telling stories is a great way to be engaging, make your message understood and is memorable as well.  Story telling is a sticky teaching trifecta! However, in homage to what is probably the most important rule of sticky teaching – identify your core message – I did my best to create three categories and organize the topics within them (demonstrating another principle of sticky teaching, providing cognitive guidance.)

To wrap it all up: Sticky Teaching is teaching that is engaging, understood and memorable.


Train the Trainer: Critical Thinking in the Wine Classroom

One of my rallying cries in wine education and ALL education for that matter, is to teach our student skills far, far beyond the basic memorization of facts.  I’ve spoken at many a conference on this matter, and have dedicated many of my posts on this blog to the subject.  It’s all about teaching to the “higher order thinking skills” known as (I’m not making this up) “HOTS” rather than just teaching to knowledge or memorization, known as “lower order thinking skills” or “LOTS”.

One of the best ways to teach to the “HOTS” is to guide your students to use the information rather than just remember it.  For instance, in my red wine class for beginners, I hope that my students will not just memorize the names of the red wines and the vocabulary words we discussed, but be able to use the information in some meaningful way, such as:

  • Describe what tannin is, and discuss how it adds to the overall character of a wine.
  • Discuss acidity in red wines and how it compares to acidity in white wine.
  • Describe a wine’s method of production and how it lead to some certain character of the wine…

What we are doing here is teaching critical thinking skills. Critical thinking can be traced in Western thought to the Socratic method of teaching used in Ancient Greece, and in the East, to the Buddhist Kalama Sutta. It is a part of the formal education process, increasingly significant as students progress through the higher grades, and should be the main concern in college and graduate-level teaching.  Obviously, critical thinking is an important part of just about every profession. 

According to Wikipedia, “There is debate among educators about its precise meaning and scope.”  Thank you, Wiki..very well said.  Crtical thinking is indeed one of those concepts, like “Politics” or “The Economy” that everyone understands but is hard pressed to actually define.  So here goes, my contribution to the debate…my definition of critical thinking:  The process of actively using new information by application, analysis, or evaluation. I tried to keep it simple.

Here is a list of my favorite techniques for adding critical thinking to the wine classroom:

  • Compare and contrast wines (or regions, or winemakers) by style.
  • Group wines into categories and explain why and how you chose the categories.
  • List wines in order (lightest to fullest, simplest to most complex).
  • Support an opinion with evidence. For instance, this wine is complex because…
  • Discuss whether or not a certain wine appeals to you, and tell us why/why not.
  • Describe a certain aspect of a wine (tannin, alcohol, residual sugar) and discuss how it relates to the other elements of flavor.
  • Predict how a wine will interact with a certain food.

And to make it easy, you can use what I call a “Bubbly Professor Brain Crank”.  I like to call this one “The Instant Critical Thinking Tool”: 

This wine is ____________  because ______________.

I like to use this sentence for class discussions, and it has a tendency to show up on my final exams.  I love it because it appears simple and un-intimidating, and yet you must use critical thinking to answer the question.  It’s also perfect for discussion because there are an infinite number of correct answers.  Students like that feature for test questions as well.

Here’s a sample…just how would you answer this question?

This Beringer Private Reserve Cabernet Sauvignon 2019 is ___________ because ________________.  

Made you think!  

The Bubbly Professor is “Miss Jane” Nickles of Austin, Texas…

Lessons in Teaching: Learned at TexSom

I am lucky enough to be attending the Texas Sommelier (“TexSom”) Conference this weekend at the lovely Four Seasons Resort in Las Colinas, Texas.  Being an educator and not a sommelier, I know that I attend conferences of this sort in a much different mind set than the typical attendee, but there is a plenty of valuable information and experience to be gleaned by sitting in the audience and watching someone else teach.  As a matter of fact, it’s my favorite type of vacation; all you fellow teachers out there will relate to the feeling of relief you get when someone else is on the teaching “hot seat” and you can lean back and watch.

So, it is with much gratitude for the conference leaders and presenters that I share with you a few great teaching lessons learned and reinforced by the seminars I’ve seen at TexSom this year!

Lesson in Teaching:  Tell a Story!

The Tomb of Eleanor of Aquitaine. Good wine story!

The first session presented on Sunday, led by Wayne Belding and Brett Zimmerman, both Master Sommeliers, was all about Bordeaux.  The presenters led us through the story of the history of Bordeaux, all the way back to the middle ages and the marriage of Henry Plantagenet to Eleanor of Aquitaine.  This marriage made the French region of Aquitaine an English terriority, which opened the wines of the Bordeaux region to the English market and eventually to the world stage.

The name Aquitaine itself means “the place of much water” and describes not only the main rivers of the area but then-marshly lands around the Medoc. Another fasciniating part of the story of the history of Bordeaux takes place in the seventeenth century, when English demand for the wines of Bordeaux increased to the point that Dutch traders began to drain the marshlands around the  Medoc and increase the land available to vineyards. This caused the vineyard area in Bordeaux to expand so much that no one could really tell what area their wine was from, which in turned led to the first delination of the vineyards of Bordeaux.  This classification was completed in 1725, with the collection of districts being known as the Vignoble de Bordeaux.  At this time, individual bottles began to be labeled with with both the region and the specific area from which they originated.  I was fascinated to learn this ancient history of Bordeaux and happy to add some more “tales of the vine” to my arsenal of teaching tools.

Why is storytelling a good lesson in teaching?  It is a proven fact that the use of storytelling – called “the narrative approach” in teaching lingo – is one of the most effective ways to add interest and engagement to a presentation.  Storytelling works in just about any educational platform from lecture to discussion to on-line, and can help you reach your audience on both an intellectual and emotional level.  A well-placed story can make theories or abstract ideas concrete and accessible, can spark interest in new material, and can help students memorize facts.

Lesson in Teaching:  Compare and Contrast 

Oregon Pinot: Did you prefer the Hippie or the Cowboy?

The last session I was able to attend on Sunday was all about Oregon Pinot Noir.  Presented by Fred Dame and Nate Ready, both Master Sommeliers, the session was subtitled “The Cowboy and The Hippie.”  Fred and Nate both presented some fabulously delicious Pinot Noirs, which would have made the session good enough, but what made the session even more interesting was the dichotomy in the way they both chose and presented their wines.  Fred represented the “Cowboy” approach and chose wines made in a “get ‘er done” style that produced a wine that was pure Pinot Noir – juicy, fruity, in some cases jammy – and showing lots of spice and floral aromas.  Nate represented the “Hippie” approach and chose wines that were done in a more “touch-feely” (some would say organic-biodynamic-light of the moon) style with lots of earthiness and subtlety.  The wines were presented two by two – with one wine is each set representing the hippie approach and one wine representing the cowboy style.  Presenting the wines this way enabled the audience to not just taste the wines but really think about them in terms of style; which by the way is the “language” most of our customers think in.

Interestingly enough, my favorite wine of the flight was the 2010 Penner-Ash “Dussin Vineyard” – pure Cowboy.

Why is “compare and contrast” a good lesson in teaching? One of the ultimate goals for any teacher is to guide his or her students to not just “know” (or worse yet, “memorize”) new information but to use that information in a meaningful context.  In this way we are teaching critical thinking skills and such teaching is considered a “higher level” teaching skill, as opposed to just teaching a page full of facts. One excellent technique to involve the use of critical thinking skills in a class is to have students compare and contrast items or ideas.  By ending the Oregon Pinot Noir sesion by asking the audience “which wines did you prefer, the cowboy or the hippie” the speakers were forcing us (in the nicest possible way) to use critical thinking.  

The Bubbly Professor is “Miss Jane” Nickles of Austin, Texas.

Week One, Day One: The Introduction to Wine Class

Next week starts a brand new semester and among the classes I’ll be teaching this block is my sentimental favorite – The Introduction to Wine Class.  I offer Professional Wine Studies, Wines and the Culinary Arts, and Wine and Food Pairing as well as semester-long looks at both Old World Wines and New World Wines, but the introductory class remains my favorite.

It’s great to see wine newbies go from “What is Wine” to “The Legend of Sassicaia” in just over 12 weeks.  I always like to start Week One/Day One simply enough with “Wine, Defined.”  I am sure that every wine educator out there has their preferred version of the answer to the question, “what is wine”?   My is quite simply, “Wine is a beverage produced by the fermentation of fruit, mainly grapes”.  Of course this answer leads to many questions and further disucssions…what is fermentation, why grapes, and “can you make wine from Welch’s Grape Juice”?  Of course, the answer is yes…it just won’t taste very good!

And it never fails, within the first ten minutes of class someone will mention the following subjects:  Boone’s Farm, Four Loko, Sangria, Hellow Kitty Wines, Prison Wine, Mad Dog 20/20, Saké, Arbor Mist Blackberry Merlot, Thunderbird, Mimosas, Cristal, and Ace of Spades.  Fellow wine educators, I bet you have your own list, I would love to hear about what your students ask on day one!

And somehow, we get through it all.  I like to have a basic “learn how to taste” session on Week One/Day One as well, both to get the class off to an engaging start and also to lay the ground work for the more detailed, directed tastings we will have as the class progresses.

My introduction to sensory evaluation class is admittedly quite technical.  I tell the students what the wines are, but I ask them not to focus on that one particular wine but rather to use the wine at hand to learn about the sensory evaluation of  “every wine or any wine.” 

I use just three wines; an unoaked, crisp Chardonnay (A Macon-Villages is ideal), followed by a simple yet sweet white wine (I’ve been using Flat Creek Estate Muscato D’Arancia), and finish with Sterling Vineyards Napa Valley Cabernet Sauvignon. 

The basics of sensory evaluation class that I teach on Week One/Day One does not follow the basic steps of wine tasting.  We will get to all the expected steps (sight, swirl, sniff, snort, whatever…) in the course of the session, but not exactly in that order.  I tell the students that we are going to do approach the wines in the proper order (dry before sweet, white before red, light before heavy) and that we will let each wine “reveal” its secrets to us – in other words, each wine has something special to teach us. I choose my flight of three to include a wine that perfectly shows acidity, one that has sweetness, one with bitterness and tannin, and make sure that within the set of three, each of the major aroma families is there in an easy-to-recognize manner.  I want the class to be chock-full of “a-ha moments.”

Then I launch right in, teaching what I call “The Nine Elements of Wine Flavor.”  The nine elements are: Acidity, Sweetness, Bitterness, Tannin, Umami, Aroma, Body, Balance, and Alcohol.  I told you it was technical!  It does start off quite scientific, with discussions of pH, IBU’s, R.S. and ABV, but by the time we add aroma to the mix I make sure the step off the path of “paralysis by analysis” and let the students just relax and enjoy the flavor of the wine.  And somehow, it all comes together in the end.

If you’d like a copy of my handout about “The Nine Elements of Wine Flavor” just send me an email request to”  missjane@prodigy.net .

The Bubbly Professor is “Miss Jane” of Austin, Texas.

Finals Week in Wine Class

It’s Finals Week!

Final exam week in Miss Jane’s 12-week professional wine studies class has arrived!  To answer your question, NO…the wine final does not involve binge drinking, glasses clinking or happy hour. Like most college-level courses in hospitality management or culinary arts, we have both a practical and a written final exam.  Our written final exam is scheduled for this Friday; a 100 question multiple choice test followed by three essay questions.  

Please note that the title of this course is “Professional Wine Studies.”  While many of the wine classes taught around the world center on tasting, this course is centered on basic wine knowledge and how to use it within the context of a hospitality career.  I focus the class on learning about basic wine styles (white, red, sparkling, dessert…yes, that basic); how they are made, where they are made, and the world’s best known or most popular examples.  We learn how to taste wine so that we can talk about wine, and spend several class sessions role-playing the role of the server, sommelier, or salesperson.  We use my “mad libs for wine” to learn to write meaningful, concise wine descriptions. We learn about beverage costing as it applies to wines by the bottle and glass. We spend a good deal of time of food and wine pairing, which makes sense as most of my students see themselves as future chefs.  Finally, we spend a good deal of time discussing how to write a wine list and market wine in a restaurant or other setting.

So for my final practical exam this semester, I came up with the idea of an exercise in writing a wine list.  I started out by surfing the internet for nice, clear pictures of wine labels. This took a while as I wanted to use wine labels from wines we had studied and my students would be familiar with.  I also wanted a good mix of red, white, dessert wines and sparkling wines.  I came up with a word file full of about 30 wine labels that includes Bordeaux, Chianti, Rioja, Napa Meritage, Lodi Zin and Oregon Pinot for the reds.   For the whites I found Fumé Blanc, a nice German Riesling, an Aussie Chard…you get the idea.  I had six sparkling  wines including a few from California, a Cava, a Prosecco, and of course Champagne.  For the sweet wines I included Moscato d’Asti, Sauternes, Late Harvest Zin, Ruby Port and Muscat-Beaumes-de-Venise.  Remember, these are all wines that we had studied, and in most cases, tasted.

 I did a bit of cut and paste and gave every student a stack of 30 wine labels, and created a faux “wholesale price list”. Then, I gave the class two hours to write a wine list that was to include the following details:

  • Meaningful Categorization
  • Absolutely perfect listing of each wine to include producer, name of the wine, region of origin and vintage date (as applicable)
  • Progressive wine list format
  • A concise description of each wine (I like to use what I call a “five word description” such as “light, dry and crisp with fruity and floral flavors”.)
  • Two food pairing suggestions for each wine.
  • Pricing by the glass and bottle, as well as a spreadsheet detailing each item’s potential beverage cost and gross profit.

As they completed the project, I had every student bring their list up to me for a quick discussion and review.  Lots of learning can go in during that review period.  I had them describe how they chose to categorize their wines, how they arranged them in order and how the details of the list will be useful as a sales tool.

All in all, I have to say I think they all did a great job!  I was very impressed with the final projects, and think that it was a meaningful, active learning experience all around.  It was good exposure to the “nuts and bolts” of writing and designing a wine list.  Most importantly, we all had a great time and I feel it was a good example of active learning and a “flipped classroom”.

If you would like a copy of the materials I created for the class, click here: Bubbly Prof – Wine Labels for Wine List Project

The Bubbly Professor is “Miss Jane” Nickles of Austin, Texas – missjane@prodigy.net 


Flip Your Meetings!

The other day I was playing around online while waiting to board a plane.  I was finger-surfing on my iPad for articles on “flipping the classroom.” There’s been a lot of buzz about flipping the classroom, including here on The Bubbly Professor and lots of other blogs. The flipped classroom is such a great concept for teaching that it’s become my newest endeavor to read everything I can on the subject.

About ten minutes into my web surfing session I read a statement that literally changed my life. How often does that happen?

The statement was part of the introduction to what appeared to be a great article on flipping the classroom.  I say “appeared to be a great article” because I never read it.  This one sentence was so powerful I turned off the iPad, pulled out one of my handy-dandy yellow pads that I do all my “real” work on, and started writing.  My work life was forever changed!

Here is what I read, as close as I can remember:  “Do you leave meetings with more work to do than when the meeting began?”  Oh yes I do! Not only do I leave meetings with an elongated list of things to do, so does every poor soul who has ever attended a meeting that I was in charge of.

One simple sentence was to become my personal life-changing moment.  If you are the author of this sentence, please contact me.  I want to read the rest of your article.  I want to give you credit for this idea.  Most importantly, I want to worship at your feet for the rest of my life.

My True Story of Meeting-Flipping 

About two months ago, I had a faculty meeting.  My ten or so extremely dedicated  faculty members and I gathered around a round table and I led what I thought was a productive meeting.  The agenda had been distributed in advance, we had a lot of things to go over, and we had a lively discussion. Success (or so I thought)!

In my old (pre life-changing moment) way of leading meetings, it was a success. But in my new way of thinking….it was a waste of time!!!  Here’s why:  one of the items on my agenda was this:  Annual Faculty Development plans due by April 1!

What had actually happened during my “successful” meeting?  I distributed some information that could have been done just as easily (and much faster) via email, and everyone present left my meeting with “one more thing do.” And for the record, how many faculty development plans were turned in by April 1?  Zero!!!

The New Meeting World Order

So here’s how I led the next faculty meeting.  I sent out a meeting invitation that read as follows: “We will complete your annual faculty development plan at this meeting.  Please start thinking about what you would like to do this coming year in order to improve your teaching ability.  This can include conferences, seminars, courses you’d like to take, professional certifications you’d like to achieve or anything else you can think of.  See you next Friday!”

Faculty Development Friday

When the meeting came around, we met in the same conference room around the same table as we always had before.  But this time, when our hour was up, no one left the room groaning that they had one more thing to accomplish in an already busy schedule.  Instead,  everyone had a completed Annual Faculty Devlopment Plan.  It was fun, and it was easy. 

To start the meeting, I gave everyone a blank copy of our faculty development plan template.  I had everyone fill in their name, anniversary dates, employee Id numbers, all that stuff.  Then, we went down the list of items to fill out.

First item – Professional Certification:  “What professional certifications are you interested in pursing this year?  Who wants to work towards their CEC? Great, what are the steps.  Study, take the practice tests, take the written test, take the practical exam, complete the final application packet and mail off. If you are interested in the CEC write these steps down in section one and fill in the completion dates that will work for you.  Who would like to pursue a CSW?  Great, what are the steps?  Get a study guide, study, take the  practice tests, review with your mentor, take the written exam.  If you would like to pursue a CSW, write all that down in section one and fill in the dates that work for you.”  And so on, and so on…in about 15 minutes we had all finished section one.

Next section – Training offered Internally:  “Everyone write these down…Sticky Teaching on May 15, Brain Rules for Teachers on June 12, Bloom’s Taxonomy on July 25 (etc, etc.). These are the faculty development sessions that I will conduct in house.  You need to try to attend at least six of these and when you do, make sure to note on your faculty development form three take-aways from each session that you plan to use in your teaching in the coming year.”  Ten minutes later…section two done!

Next section – Training Obtained Externally: “Here’s a list of classes and workshops offered on-line.  Two have already been budgeted for each of you.  Pick the two that most interest you and write them on your form. If you have a conference or convention in mind that you’d like to attend, write it down and I will let you know if we can budget for it by the end of the month.” Twelve minutes later, section three done.!

Final section – Classroom Observations:  “Everyone write down the name of the class you are teaching this semester that you would like me to visit in order to conduct a classroom observation.  Same thing for next semester.  When the Fall and Winter schedule comes out, be sure and update your plan and let me know which class you’d like me to visit.”  Ten minutes later, we’re done.

One hour from start to finish and everyone has their faculty development plan done.  Everyone had the opportunity to benefit from the ideas and challenges of their colleagues.  Everyone is excited about the opportunity to improve their teaching skills. Everyone has a new professional certification goal in mind. Best of all, everyone – including me – gets to check one big giant thing off of their big giant “to do” list.

What else can I say? I’m a meeting flipper for life.  And if this was your idea….make yourself known!